the access point

06-12b013

“You can call it: the cheap solution to an expensive problem”, my colleague Zakayo told me. A very cheap solution, yes, indeed.

Some time ago, our offices were provided with some nice HP desktop computers as well as an access point for a wireless local area network (WLAN). Except for the usual problems (e.g. ppl transmitting computer viruses (not virii!) via USB flash sticks), the wireless network had been left switched off as the previous setup could only reach 2 or 3 offices.

To give you an idea of what our compound looks like, pls feel free to check out this panorama view:

wrmatana2
(click click => opens in flickr)

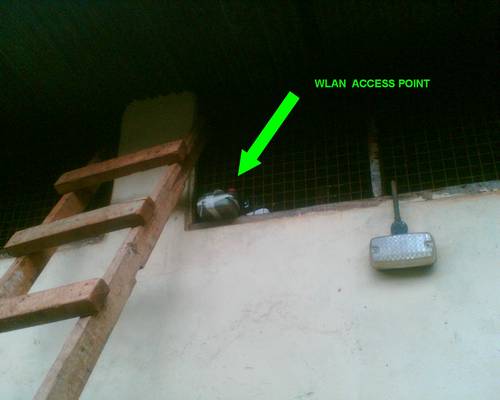
The red arrows indicate the number and position of computers, the small green arrow at this former workshop building to the very right is the position of our access point as from today. The access point (AP) used to be in the building to the left – which is why the signals never reached these offices on the other side of the compound.

The access point we are using is a simple D-LINK DWL-2100AP with a small rubber duck antenna that connects via the typical reverse SMA connector. There are in fact external antennas for such accesss points and wireless routers available on the market – even in Nairobi. External antennas come as indoor and outdoor versions. However, these cost between Ksh. 5.000 and 15.000 /= – which of course is a lot money for a simple (repeater) antenna.
I even thought about extending the antenna by using a coaxial cable and the existing antenna or even an additional reverse sma connector (I even thought about building my own antenna using this manual). Yani, the best improvement for any wireless setup (tv, radio, wlan, etc.) is to get a good antenna. Any coaxial cable in between might extenuate the already weak signal, and besides, this is Embu. There’s no 50 Ohm coaxial caboool, neither any reverse sma connector available. And I am just sick of being stopped by unable shopkeppers who don’t even know what they are selling. These gals (!) don’t even have simpoool battely horrdaaass, as mentioned earlier.

I wanted this thing to eventually work. And I didn’t want to spend too much money on this. This is a public service office that survives on donors support, revenue from water permits and salaries through the government @ job groups J & K.

Think of solutions, not problems. (Dan Eldon)

06-12b010

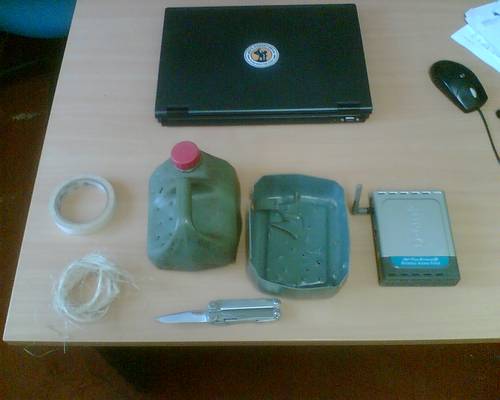
And this is what you’ll need for the outdoor protection of an access point: an old jerrycan rescued from the garbage, some sisal rope, some tape, a sharp knife and, of course, the AP.

I also invested Ksh. 249 /= for a 5m extensiooon cabooool and ….nothing else, actually. These things just do the job.

06-12b014

I’ve cut the jerrycan into pieces (just like the salt shaker :-), put the AP inside, connected it to the extended power supply and fixed it to the ventilation windows on this old workshop building (ex provincial water office workshop).

Well, what can I say? It works. It just works. The signal is now strong enough to reach the whole compound, all computers are hooked up, are secured via the typical WLAN security measures and we only spent an additional sum of Ksh. 249 /= which could have been even less by using a simpoool powaaa caboool which sells for Ksh. 45/= /m.

The reason for blogging this is because in the past, I’ve seen a lot of money spent on expensive high-tech whereas simple and cost-effective solutions also do the job. And as long as we’re talking about public funds, the money issue is important, I think.

(funny thing: the wooden ladder as seen in the pictures was made to be heavy so that it doesn’t “walk away” (~ get’s stolen by someone). welcome to the public service! :-)

The Rucksack Story

Oh my…instead of finishing this one paper on sewage sludge treatment procedures, I just can’t stop thinking about my new backpack (!) and how great it is that I’ve eventually settled for the right thing. Reasons for blogging this are a) no notebook deal would be complete without mentioning other accessories (like pcmcia tv cards, yeah!!) and the proper notebook case, and b) I had spent about three weeks in August searching for a really good, reliable, spacious bag / case which would be good enough for my notebook & other items. Something that needs to be a handy all-in-one solution and come with me wherever I go. Something that looks good, but doesn’t look like a notebook case. Searching took a long time + I tortured most of my closer friends with constant asking about what they think about this and that model. To make it short: I was obsessed with looking for the perfect bag.

I’ve found it.

Well, actually I didn’t do that – it’s MB who I had sent over the Atlantic, flying to the US and spying for interesting deals which aren’t availaboooool over here in Europe. She called me the other day from IL and said: “Look, we’ve spent a whole week searching for a decent laptop backpack that matches your criterias, bought two, returned both of them after some time and ended up with a simpooool Dicota neopren sheath. You are busy with something else now and I’ve just found a very nice bag for you which costs US-$ 49,99 plus IL-taxes. Shall I buy it for you?” – “Hell, yeah, of course!”.

8050-35.jpg

She bought the High Sierra “Access”, carried it from the US to DE and forwarded it to me. Ohhhhh, nice. You see, it isn’t THE most perfect backpack, but it matches the following important criterias that I couldn’t find with available models over in DE and these are points which aren’t mentioned in product descriptions:

  • With 20″ x 15″ x 9,5″ it’s LONG enough to fit my back. I am 6.3 feet tall and don’t want to carry a brick on my back, but instead something long and slim which doesn’t make me look like one of those retarded & fat 30something still-living-at-home nerds (damn it, i am as picky as Paris when it comes to such issues)
  • 2743 cubic inches equal something around 45 liters. Now THAT’s much more than what I’d found over here. The only competing model from German manufacturer Deuter, aptly named “Giga Office“, only offers 32 liters, is shorter and looks like a brick (see above).
  • It has many small pockets with double zippers = can be locked to prevent theft e.g. when someone is walking behind you and trying to open the zips without you noticing it
  • It has a rain cover which also works as a padding for valuabe items like the notebook.
  • Up to 17″ (or 15,4″ wide screen) notebooks fit inside a padded computer sleeve
  • Comes with the usual padded back and tuck-away waist belts which most modern backpacks have. However, this one has good padding – not too thick (= prevents sweating) and massive. It also doesn’t come with a stiff back like most other alternative models have (the one I had bought before was very nice with a massiv plate in the back but couldn’t securely protect the computer inside).
  • When you are carrying this model on only one – the right – shoulder, there are moments you just want to pull it forward to access some pockets. Now this one has a zippered side water bottle pocket and another side zipper which makes it quite easy to actually use this backpack efficiently. That’s one of those points you only notice once you are actually using it and are forced to live with the provided backpack design. Good!
  • It has a zipper close to the back side which allows you to vertically enter the notebook without pushing or even forcing it inside. Most backpacks are nice and blablabla but lack this very simple zipper – the user is forced to make room first of all until he can put the machine inside his backpack. With the zipper in the back, there is direct access to the computer sleeve.
  • It’s small enough to fit into any cabin luggage compartment (important!) but still bigger than my previous BREE hand luggage bag which has served me since 1993.

Anyways, nice backpack, good choice, great price and big up to MB for saidianing mimi on this matter!

virtual pc & usb toolbox

Some time ago, my dear friend Mr. Burns advised me to install an english operating system (OS) like WinXP on my notebook so that I will have less problems explaining things on it whenever I’d need it for a presentation in an english speaking environment.

Being the typical Geek 1.0, I was first irritated by the idea of installing yet another OS on my beloved machine and didn’t want to spoil the MS-dominated bootsector and other vital parts of my german WinXP version that could be affected by another OS.
And then, again, I keep on forgetting about the two virtual pc environments that have come up in the past and that I and many others have written about. For those who need to know – well, you most prolly already know this, but for the computer beginners, let me just explain this: there is a secure, hassle-free way to have more than one operating system runing on your computer. But why would you want that?

The average Windows user out there installs a few programmes for testing, dislikes them and decides to de-install them again. The deinstallation process though does not cover ALL parts of the previous installations and “forgets” some additional files that are left on the harddisk for eternity (~ until your next installation of Windows). And there are many user-utilities that have no other purpose than cleaning up your messed up installation of Windows and/or lost entries in the Windows-registry (where, as the name suggests, all programmes are registered for use with the operating system). You end up getting a messed up Windows that needs to be re-installed / repaired / etc.. And all this just because you wanted to test this or that small tool you urgently needed to rip-music cds, flash mobile phones, draw a picture in CAD or maybe because you were testing diverse media players that each come with their own setup-installation-routine.

Or in other words: most beginners need to take time to understand which programmes they want to use on their Windows OS and will have a collection of programmes they are going to install after a clean installation of windows.

The solution is to use so-called virtual machines – which are nothing else but virtual environments right on your existing operating system that create a single file into which a whole operating system can be loaded / installed.

Let’s say you want to try out a Linux distribution like the popular Kubuntu 6.06 and already figured you wouldn’t want this to run from a so-called Live CD (= boots from the CD without any installation). Neither are you willing to screw your existing Windows bootsector by installing a Linux Loader tool that gives you the option which OS to start during the boot-up process. And although there’s always a way for the experienced user to solve such problems, what we are looking for are simple, fast and free solutions. After all, all you wanted to do is (safely) testing a piece of software….
Instead, you might be interested in creating a so-called virtual machine. Something that gives you access to a full Linux environment AT THE SAME TIME while you are using Windows XP without restarting/rebooting your computer.

And as I’ve mentioned earlier, there are two choices for that: the MS Virtual PC and VMWare.

The MS Virtual PC (demo) is a free download from MS that enables you to set up a virtual environment on your existing Windows OS. After installation, you are guided through a set up process and open a new virtual pc. A window pops up and you get a black screen, a virtual pc booting a virtual BIOS. From this point onwards, you can install either another MS operating system, or even load a virtual ISO (image file) to install a Linux distribution. Basically anthing that you would also install on your computer from that level.
VMWare offers an alternative for the more professional user – it is able to handle processes in a different way and has much more options. VMWare offers a player (VMWare player) that is able to “play” pre-installed virtual machines (operating systems and aplliances) which can be downloaded from the Virtual Machine Center for free!

And as much as I love the VMWare player, the MS Virtual PC software seems to be adequate enough for my purposes as it provides an english OS at the click of a button. Simple as that! :-)

—–

The other day, I blogged about tools that start right from your very own USB memory stick.

You don’t need to be in a developing country to experience what it means to have restricted access to your own computer. Let’s say you are a traveller and would like to check your e-mail from an internet café somewhere on this planet. You’re lucky you’ve found a free seat and have already gotten over the fact that the guys running the café are ripping you off with the amount you pay per minute surfing. Aaargh….yahoo/hotmail/gmail/etc – the webmailer takes ages to load and opening a single page is a pain. Advertisment banners load first (unless you’re using a prof. webmailer) and you end up paying extra money just for reading and answering your mail. Remember: you’re paying for the amount of time you’re online.

Now, in a country like Kenya, not everyone has his/her own computer. Even less ppl have access to the internet – but USB memory sticks are for sale at a reasonable price. The idea is to make use of USB memory sticks other than just storing personal data. Applications that are installed onto the USB stick and run from it. I know there are already some models out there that come shipped with pre-installed applications, but instead of focusing on the software only, I would still like to point out the benefit you get while using software installed on your memory stick instead of using the browser the internet café offers:

  • You are using your own software and can personalize the browser and settings. Speaking of bookmarks – here’s your perfect way of storing bookmarks that will stay where you’ve put them.
  • You can download your email by using an email client such a Thunderbird. More than that, you can edit emails offline and mark them for transmission once you’re back online. Imagine downloading them in an internet café and editing them somewhere else at at friend’s place (who does not have a modem/inet). Downloading online and editing offline takes less time than reading and answering them online with the fear of log-outs from your fav. webmailer due to inactivity / while writing longer mails. Also, it’s much cheaper this way.
  • Modern Web 2.0 technologies are nice as they offer online services which were previously only available offline (word processing, spreadsheet, image editing, etc.). However, these services are only available online – and since you are paying for the amount of time spent online – you’re better of using offline applications. The internet café does not offer such tools? Don’t worry – they are on your memory stick.

Now, as not every user is aware of these possibilities, I can imagine a few smart hawkers on Nairobi’s Moi Avenue & Co that have compiled application packages and are willing to upload them onto USB memory sticks for some bob. And for those who want to do this on their own, here a few useful links to software compilations and recommendations:

Portableapps; list @ Snapfiles; Wikipedia listing; another Wiki; Essential USB Memory Drive Projects; list @ Combobulate; no-install.com; portable USB software; portable USB software 2; portable freeware; list of USB applications; Winpenpack.com; portable freeware 2

Hope this helps!

offline worlds

Being on the road during the last week has kept me away from blogging. Also, I had problems accessing the internet / finding an open WLAN hotspot nearby. Even thought about using this really awesome BackTrack Linux LiveCD which helps to gain access onto locked WEP networks. However, I didn’t try it becos a) couldn’t initialise the wlan module on my notebook and b) didn’t have the time to configure it. I’d love to have this as a virtual machine on my system, though. Maybe there’s an easier way to get this distribution as a fully loaded appliance for the vmware player.

Speaking about accessibility, I am currently trying to prepare my notebook/system for offline use. That is, installing offline tools that will help me get going where there is no or only limited Internet access. After all, most Web 2.0 utilities are nice but they lack one simple logic: they only work online and/or require a server somewhere. It would be nice to have this technology implemented in a simple operating system that works much more like a server. Instead of having a fixed operating system installed on the HDD with various additional programms, it would be nice to have it run on a virtual machine – and the installed operating system could be limited down to very basic needs / just provide the GUI. Also, I think this will be part of the future – more and more systems being less dependent on the actual hardware, but instead swapable like USB memory sticks. Imagine this scenario where you’d take your computer with you on a simple USB stick (it would run on such a memory stick) and static data could be added/mounted additionally.

But I digress.

Actually, my dear friend Onnomoja recently went to Southern Sudan and complained about the lack of internet “out there in the desert”. Of course, you’d think, of course there’s no internet out there. But then, there are a lot of things you’d like to check out while on the road somewhere and – being a kid of these modern times – we have meanwhile become used to just google it or check it out on Wikipedia and other compiled resources. Hence, what is needed is a way to either sleep for the next 50 years and wait until the earth is fully connected, or else check for helpful offline alternatives that are just as accessible as the internet is with it’s various resources.

The following two tools seem to be nice for offline use and I’d be happy to read your personal suggestions in the comment section to see what kind of tools also do the job offline when there’s no internet available.

1. Blogdesk
Blogdesk is a free-of-charge (Windows) offline editor for your favourite blog systems. Available in different languages, it comes at a size of ~ 4 MB (WinXP, 2k, 9x) and really helps to prepare entries when there is only a limited timeslot for internet access. Compile your entries offline and upload them when the connection is stable. Modem users will really like this, I think.

2. LingoPad
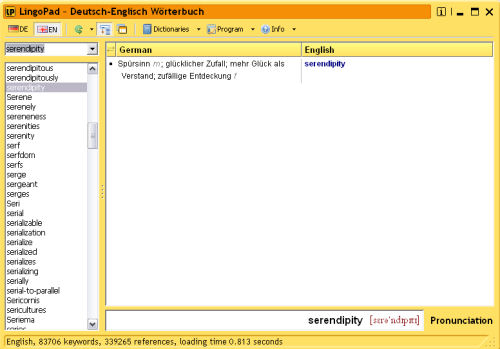
I just installed this free multilingual dictionary on my system and all I can say is: WOW! This is exactly the kind of programme I have been looking for – a free, stable little tool that provides access to various offline dictionaries. Most alternatives are commercial, somewhat expensive and require lots of system resources. What I wanted is a little tool that instantly loads without much hassle and is as up-to-date as possible.
You know, here in Germany there are two great German/English dictionaries availble online: LEO and Beolingus – both websites run by universities (Technical Universities of Munich and Chemnitz) and, unfortunately, the LEO database used for their online dictionary isn’t available for download yet. These websites are great, as they provide many many entries for each word – not just simple 1:1 translations. But then, again, only online. LingoPad tries to change that, as they are using parts of the TU Chemnitz dictionary database. Great!

lingopad.jpg

And of course, there are many other free tools available for offline use. Just think of email clients or small editors that run directly from the USB memory stick. I wonder why ppl still go online, write emails and actually pay for the time online. Instead, they could rather write/edit their stuff offline and then use tools on USB sticks to manage their online duties. Just think of various cybercafés in Kenya and the many USB memory sticks that are currently on offer in Nairobi. Wouldn’t it be nice to have an offline package of useful tools for those users that own no other hardware but a simple USB stick where they store their data? This would also help to curb the issue of accessing certain webmail providers while in Kenya – some of those pages take ages to load due to various reasons and instead of paying for online time (trying to open these pages and THEN editing their emails etc.), they would only pay for the actual time it takes to e.g. send & receive emails by using an email client. Only a few people, I think, are aware of these possibilities. Ama?

jua kalicious displaymoja

Well, talking about display protection foils in my previous post, I thought about trying some non-destructive methods on my own book – also with the intention to create something dead simple, low cost and easy-to-rebuild for anyone interested. After all, what I was looking for is a simple solution to an existing problem.

ATTENTION:
the following mod is VERY jua kali and is for demonstration purposes only!

I first tried to use a rather huge sticker I’ve found in one of my drawers (btw, THX DED!) to “mold” the frame…

mod1.JPG

Cutting and folding this one requires decent tools and lots of patience and the right adhesive on the sticker. So I skipped it and used normal fabric tape to make the frame in which the simple cover is supposed to glide around.

mod2.JPG

mod3.JPG

mod4.JPG

Obviously, this is just a demonstration to show you what I meant in my previous post. Something that protects the screen when the notebook is closed, and what is stored away – but not completely removed! – when the screen is in use.

I was looking for a stronger material/foil/paper that could be flexible enough to move around the edges of the screen and ended up using some pages from a brochure on water problems (~maji ni maisha).
Now, this is the sweet part of the whole idea: ADVERTISEMENT! Companies could print their ads on this and give it away for free + a detailed installation instruction.
Maybe instead of glueing this onto the display frame, it could just as well be some sort of silicone skin which would then be pulled over the display and add a protective and moveable shield (and yes, we’re not talking about BestSkinEver bubudius or 3M® Vikuiti display protection). Just a fast and simple add-on for the 2nd most important user-interface (next to the keyboard) on a computer: the display.

Or as Hash normally puts it with his Web 2.0 recommendations:
“It’s fast, it’s simple, it wins. Try it!” :-)

Displaylicious

What’s the difference between hardware manufacturers and hardware buyers?
The latter ones aren’t getting paid for having good ideas and will be shocked by the amount of time and energy it takes to get things into production. So what else can you do if you want to see good imagineering? Buy an Apple MacBook (the magnetic power cord – brilliant idea!), watch old MacGyver and/or blog about it…

When I received my new notebook, I found this plastic film/foil in between the keyboard and the display to protect the display from any scratches. Hmm….there are many many notebooks out there that have display problems – unless it’s a ThinkPad, there will almost always be some space left in between the display and the keyboard when you close it. Space where dust and other unwanted objects enter. Stuff that ruins your display in the long run. So, what to do against it?

nx8220curtain.JPG

I just taped the foil on one side of the screen so that it doesn’t get lost and can be removed while in use, but is back in place when the machine is closed. Now, this solution looks pretty much jua kali and just serves to illustrate the function of such a protective foil. I would like to have such an extra cover for the screen that protects it while the machine isn’t in use, and is invisible when it’s on. The solution?

A “pull-up curtain”, as I call it. Some sort of small jalousie / blind that rolls up INSIDE and at the side of the display frame, and can be pulled out either from the side or top of the frame to protect the screen. Attachment could either be done by Velcro® or maybe a very thin magnetic piece of metal. Obviously, the magnetic cover should be located away from the hdd.

What do you think – would it be possible to create something like that? (=> I urgently *need* to get my hands on an empty display frame to try this out :-)

Talking about portable computers – compared to performance improvements, there hasn’t been as much improvements on the notebook designs and making them even more transportable. Cool ideas and well designed gimmicks are hard to find or limited to special machines (=> e.g. Apple MacBook). Why?

the notebook story, part 3

a.k.a. Installing WinXP according to HP’s logic…

HP shipped the notebook with the usual recovery DVD which contains a pre-installed WinXP environment. Upon insertion into the dvd drive, it tries to overwrite the whole harddisk with a single partition. Why? Because the notebook came shipped with a single partition. A full 80 GB partition (ok, ~74 once formatted).

Now, for those of us who have more specific needs and for example don’t keep the (dynamic) user files on the same partition, there are of course ways to partition the HDD and put those files that need to stay on the HDD for longer onto one of them. Just imagine this scenario where you would keep the needed drivers, applications and your own personal files (text, music, video, etc.) and settings on a different partition which is save and wouldn’t be affected once you’d have to reinstall Windows. And those of us who are forced to use this OS (~ the majority), know about the need to frequently reinstall Windows. I think the average user does that at least every year unless you never use your machine and/or never install any new software (of course, those who just want to have a stable system have their small selected choice of programms they are using and otherwise never change a running system).

Now, WinXP normally provides us with a menue where you can choose the partition and settings for a new installation. Not so with the recovery DVD! No menue during the Windows installation routine where you could select the partitioning process and then scale the HDD down to your desired choices. Is this the OEM Version that I bought? I DON’T WANT A SINGLE PARTITION.

And there are of course ways to single-out the installation files of the provided recovery DVD and e.g. make a small Isobuilder CD which only contains the WinXP installation files without any HP add-ons. But it should be easier than that….

So I wrote to HP, asking for a workaround and you know what they replied?

Thank you for contacting Hewlett-Packard’s Commercial Solutions Center.

A partition is a logical section of a hard disk on which Windows can write data. Every hard disk must be partitioned before it can be used. Often, a hard disk is set up as one big partition, but you can divide a hard disk into multiple partitions. When you partition a hard disk, you decide how much space to allocate to each partition.

For example, assume that your computer has an 80-GB hard disk. If you purchased your computer with Windows XP already installed, or if you installed Windows XP using the default choices during installation, the hard disk likely has a single partition that takes up all of the 80 GB on the disk. However, you could divide that same disk into multiple partitions—maybe a 40-GB partition to hold Windows and program files, a 20-GB partition to hold your documents, and another 20-GB partition for future use.

When you partition a hard disk, you do not have to use all of the space on the hard disk at once. For example, on the 80-GB hard disk, you could create a single 40-GB partition and leave the rest of the space unpartitioned. Unpartitioned space on a hard disk is called unallocated space.

Please install the Operating System using the CD shipped along with the Notebook. Please perform the steps provided in the below web link:

http://support.microsoft.com/kb/316941/EN-US/

Note: HP does not support more than One partition. (<= the vital information I needed to get)

=> Exactly: a copy & paste answer that explains what partitioning is all about…..HELLO? Hewlett-Packard? WTF is wrong with your customer service? Aren’t you human beings with a brain? Are you located in the USA where the typical user is assumed to be as stupid as the president of this great nation?
I gave you a very detailed question that would point out that you are not dealing with the average Joe User, but someone who KNOWS what partitioning is all about and needs an answer instead of basic knowledge that I could even google.
The provided DVD indirectly supports more than one partition because – and this is the solution to my problem – I initially thought that it sort of overwrites the HDD with an image file (~think of Northon Ghost images) without asking for partitions. But what it does instead is that it just runs this simple script in the beginning of the installation which formats the first partition on the drive. Bingo!

Now, all we need to do is use another programme (freeware tools, Partition Magic, another Windows version, Knoppix, Ubuntu, etc.) which just partitions the HDD. After the HDD is partitioned, the recovery DVD only concentrates on the first partition (=> yes, it does not support more than one partition, but it also ignores all other partitions – which is exactly what I wanted) and installs HP’s castrated OEM version of WinXP Pro.

I really wonder WHY they change these WinXP installation routines – I think it would be wiser to leave it the way it normally comes with WinXP then additionally explain partitioning procedures to the average user. After all, there are so many other unimportant details they are explaining and that don’t differ on most computers and lots of papers/manuals that come along with the notebooks. And while I agree that most problems are just software related and which btw explains why MS introduced this “Windows compatibility” programme with hardware driver tests etc., the manufacturers like HP should just concentrate on the hardware and explain it in full detail. If you open the manual, there’s about half of the explanations about “using software” instead of simple pictures that explain how to e.g. remove the MultiBay, how to upgrade memory, how to save battery runtime (by removing the battery as long as it has an external power supply) and/or how identify hardware issues and enable customers to deliver a detailed error report. I think they could greatly save on customer service if customers were given more detailed informations on how to solve hardware problems on their own (and yes, they DO have a dissassembly manual for download online).

But instead, what HP did was referring me to the MS-knowledge base which just provides answers for a normal WinXP installation, not for HP’s limited WinXP version….